| Faerie Village 妖精村 Fearii Mura | |||||||||||||||||||||||
|---|---|---|---|---|---|---|---|---|---|---|---|---|---|---|---|---|---|---|---|---|---|---|---|
| |||||||||||||||||||||||
| I | II | III | IV | V | VI | ||||||||||||||||||
Faerie Village is a recurring location within Breath of Fire III, Breath of Fire IV, and Breath of Fire: Dragon Quarter as well as a mini-game. It is a part of Dreamland.
Breath of Fire III[]
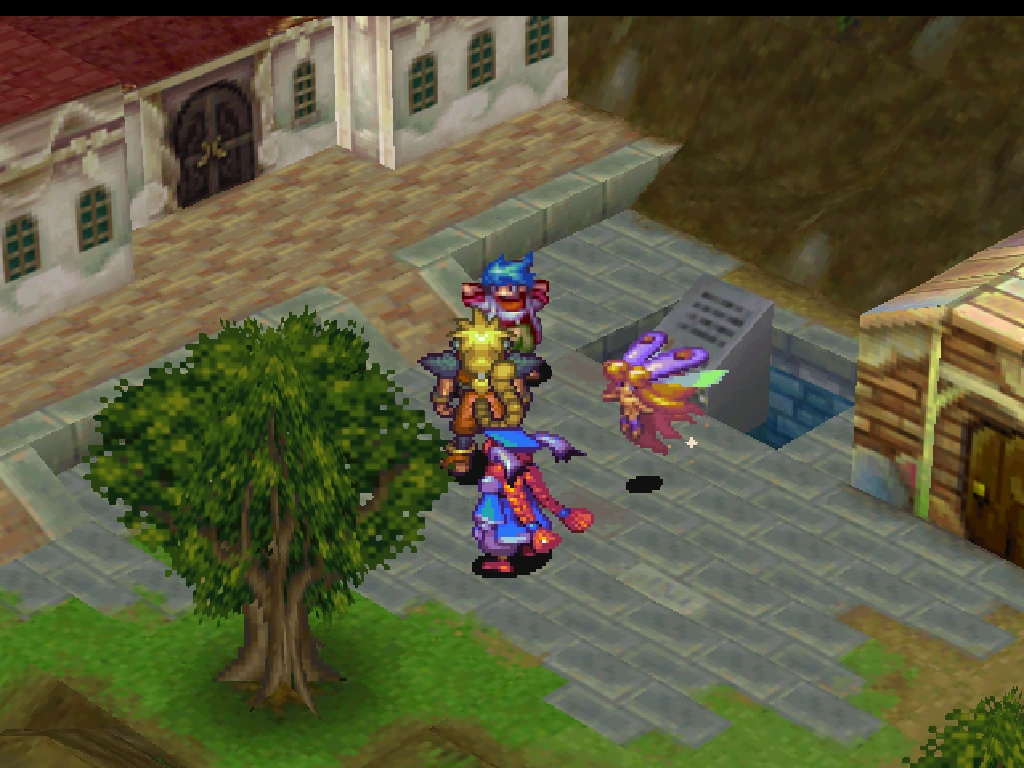
The Faerie Village is supposedly located somewhere in the Rhapala Region, since the light from the Lighthouse is able to affect them. Ryu first encounters the Faerie Village after fixing the Lighthouse, and Cadis attempts to turn it off but fails and breaks the handle. She gives him the Faerie Tiara, which enables Ryu to enter the village from any Flower ring in the world. After saving the Faeries from the Dolphin, Ryu is always welcome to return to the village. Saving them also allows you to summon Meryleep from the lake in Eastern Wyndia to apprentice under her.
When Ryu returns as an adult, the faeries angrily shout at him for leaving them for dead, as they thought, and tell him to never leave them alone again. Nevertheless, they still forgive and allow him to become their leader, thereby opening up the Faerie Village "mini"-game.
Basics[]
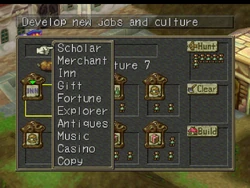
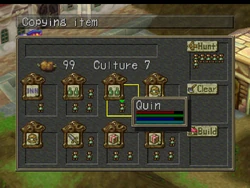
This is the main menu that the player has to use to set up the Faerie Village. It shows where Faeries are assigned, and how many food is available.
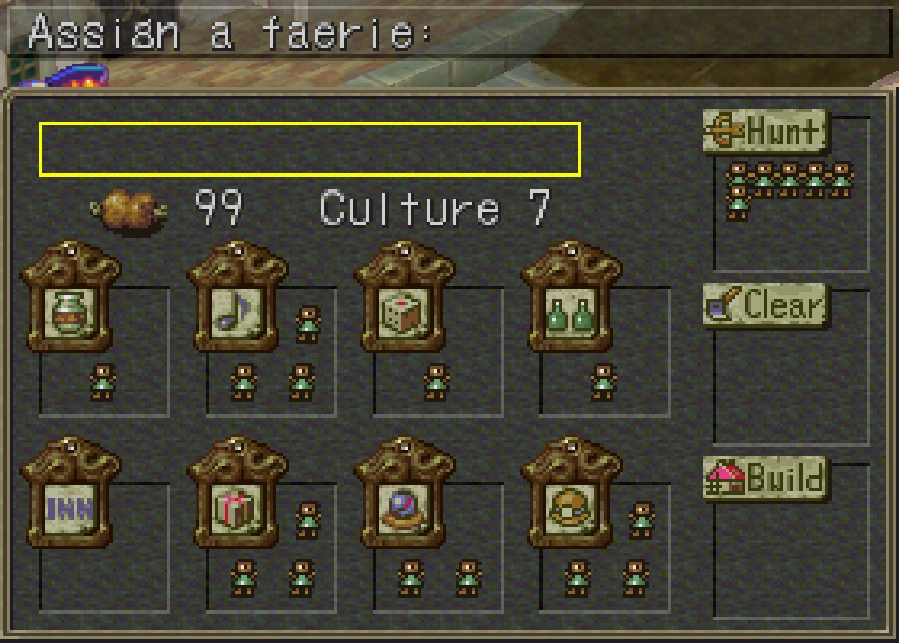
Main Menu showing all neccessary data
- Reserve List (top-left, very long box): This is where all your newborn Faeries first appear before being assigned. Maximum amount of Faeries is 20.
- Hunt: These Faeries are responsible for gathering food for the village. As your village grows, you need a decent number of Faeries assigned here in order to keep your food supply up. Otherwise the supply will drop and the Faeries will start dying.

- Clear: Faeries assigned here are in charge of clearing the area around the village in order to allow for more buildings to be built.
- Build: Starts building a Faerie Mansion near the hut that opens up to 7 more rooms for shops. Needs to have a significant amount of land cleared before it can achieve this height.
- Food: Indicates the food stock. Max Food is 99, should be kept near max for safety purposes. If the food stock reaches 0, the faeries start dying.
- Culture: Determines how efficiently your Faeries work, the higher the Culture the faster Faeries will get new shops items, jobs etc. Max culture is 7.
- Rooms: This is where Faeries are assigned to do a specific job. The player starts off with 1 room and gains more as the mansion grows.
Faeries[]
Each faerie is more or less endowed with four different skills.
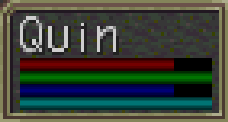
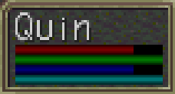
red: exploring & hunting
green: cleaning & building
dark blue: trading
sky blue: the rest
Where the player should assign each Faerie is dependent on their skills when they are born. The red bar shows their efficiency in Hunting and Exploring, the Green bar shows they are good at Clearing and Building. The Dark Blue bar is for merchants, and the Sky Blue is for Scholars, Fortune telling and also efficient Copying. Quin here is pretty good in everything, but it would be best to assign her to clear/build first. If all 8 rooms are available (making clear/build unneccessary) she should be assigned to either find new jobs or run a copyshop.
Time[]
Each assignment to be completed takes time, and a specific kind of time at that. Faerie development progresses from advancing the plot of the game and/or fighting battles. Spending time in the village, walking around the overworld, and fishing will not allow the village to advance. Fighting battles (regardless of experience), and moving the story along will do the trick, so the player should visit the village periodically, especially after finishing dungeons or doing some level building.
The first thing after coming to the Faerie Village, is to check the message board for any news. Nearly everything that happens is written down on it.
In the Beginning[]
It would be wise to start with 2/3 fairies hunting, to increase the food stock. Theoretically it would be enough to have 1/4 to 1/3 of the fairies hunting to sustain life, but in the beginning the Village has to grow... which means more food is needed. The third faerie should either clear the land/build rooms or think about new jobs. If your scholar has come up with Inn and Merchant, it may be wise to switch to researching culture up to level 7, then researching the other jobs.
Jobs[]

These Jobs are done inside the rooms you build. You can have up to 8 rooms, thus 8 different Jobs running at the same time. Each room can take up to 3 faeries.
To give a faerie a job select the house, and then select a job the faerie should do. Then select the fairy and move her into the house. Then find her in the village to use the assigned job.
Scholar[]
Scholar is the only job available right from the start. Faeries assigned to this job either increase the villages "Culture" rating or invent new jobs. A high sky blue skill works best here.
Merchant[]

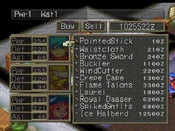


Merchants opens up one of six different shops, from which the player is able to purchase items and equipment. Although the selection of merchandise is very limited at first, it increases over time. The more faeries working, and the higher their Dark Blue skill is, the quicker the shops' merchandise list will expand.
Each shop has a maximum of 11 items, some of which are not available at other shops.
|
|
| ||||||||||||||||||||||||||||||||||||||||||||||||||||||||||||||||||||||||
|
|
|
Inn[]
The Inn allows the player to rest for 10z and save its progress. If a second faerie is assigned, she will tell how many hours the player has been playing, the number of enemy encounters engaged, and the total zenny accumulated since the beginning of the game. A third faerie will tell how many people's drawers has been looked in, how many treasures has been found, and how many times the player has gone fishing. When using exploration, it is recommended to have an inn, since the player is then able to save inside the village.
Gift[]
A faerie assigned to Gift will grant the player an item upon visit. The item granted depends on the amount of time spent between each visit. The more fairies you assign, the more gifts you can get.
|
|
Fortune Teller[]
The Fortune Teller gives the player insights of in-game secrets or trivia, as well as telling jokes. The assigned faerie's Sky Blue skill affects the quality of the response. It is a fun but low-priority job, recommended for those, who already cycled through the shops. Visiting the fortune teller will give you a fortune, which might be anything from a cryptic message, a silly comment, or a special insight about the game. If you didn't realize it already, you can learn from the fortune teller that Garr has natural resistance to fire (though not immunity like she says), healing magic harms undead, breath attacks are affected by current hit points, and you will encounter fewer monsters by walking instead of running. Assigning additional faeries will allow you to get one fortune per faerie per visit.
Explorer[]
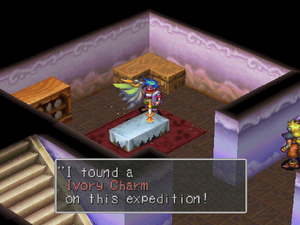
An Explorer is a faerie sent out to find items on an exploration. Depending on the distance sent (Daytrip, Nearby or Distant) the faerie may find higher quality items, but at a higher return time and risk. The closer the trip, the quicker the faeries will return, and the less dangerous it is. But the item quality will be less, and the likelihood of finding something will also be less, so if you want the best stuff, only make distant explorations. After any exploration, the faerie may not return at all, after which it is removed from the village. The faerie's Red skill affects performance.

Lucky!
Now, if you decide to explore, making distant explorations, you will want to save just before entering the faerie village. When you enter, check the message board for results. If you have waited long enough, there will be a message that your faeries have succeeded or failed. Failure results in death, and means you should hold SELECT + START for 2 seconds to reset.Reload until you don't fail, then check to see what you've found, or save first in another save spot, if you have an Inn. This way you can "select" what you want, since success with item, success without item or failure (read: death) are determined when entering the village, but the actual item you get is determined when you speak with the faerie.
|
|
|
| ||||||||||||||||||||||||||||||||||||||
|
Since this job is quite deadly it can be used to replace faeries which don't have skills you need, e.g. only a full green bar. Send the wrong one to her death. A new one will soon be born.
Antiques[]
The antiques shop is the only place in the game where you can sell (most) items that have a description "Appears valuable" for their true value. Since this shop has such a limited use, it might be one that you only create when you have antiques to sell, then immediately change back to something else (but remember to be careful about changing shops). Once you've sold all of your antiques, or if you are not in need of cash, this is not a productive use of space. There are no skill requirements for antiques dealers. A second and third faerie will just offer comments telling you there are 12 different types of antiques and one of them (the most valuable) is the Dragon Tear. There are actually more than 12 "Appears valuable" items in the game, but a few of them are not true antiques, and the antique shop will give you the same price for these items as any other shop.
| antique Item | value |
|---|---|
| Clay Vase | 100Z |
| Marbles | 500Z |
| Moldy Vase | 1,000Z |
| Dirty Rags | 1,500Z |
| Tea Cup | 2,000Z |
| Beads | 3,000Z |
| Rare Book | 4,000Z |
| Old Painting | 6,000Z |
| Myria Icon | 8,000Z |
| Ladon Icon | 8,000Z |
| Lithograph | 15,000Z |
| Dragon Tear | 30,000Z |
Music[]
Listening to in-game music is basically a "for-fun" establishment. When you first open a Music shop, only one song will be available to hear, but as you progress, more songs will rapidly be added until all 40 songs are available for your listening enjoyment. The last song you will have access to is "Castle in the Sky," so if this one is available, you know you've gained them all. Unfortunately, not every tune in the game is included amongst these 40 (didn't realize there was that much music did you?) There are no skill requirements for musicians. Adding additional faeries will allow them to generate songs more rapidly. If you have a second faerie in your music shop, she will play the final theme music played during the credits, "Pure Again" or a karaoke version of the same song (volume on vocals is greatly reduced). When you select to hear one of these songs, you must listen to it in its entirety, as it cannot be stopped once in progress. The final theme music option is only available in a "Clear" save game (after completing the game).
Music Shop Tracklist:
- Country Living
- These Little Things
- Take It And Run
- Healing
- Life's A Beach
- Even The Sun's Happy
- Walking Straight
- 30
- Crowing in the Night
- Plenty of Money
- My Favorite Trick
- Weretiger
- Technology
- Fried Onions
- Peach Engine
- In the Morning
- Fighting Man
- Guild
- Ago
- Neverending Game
- Thief
- Walking the Road
- Eden
- That Old House
- Windy City
- Island
- The Champion
- Turning Point
- Don't Say It
- Steam Locomotion
- Heavy Echo
- Cadaver
- Missing
- Dangerous Feeling
- Of Gods and Dragons
- Flight
- The Poor Marcher
- Dead Dragon Stone
- For the Dragons -- Main Theme --
- Castle in the Sky
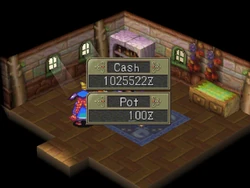
Casino[]
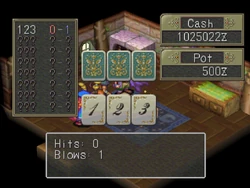
There are two different games you can play at the casino: High & Low and Numbers Guessing.
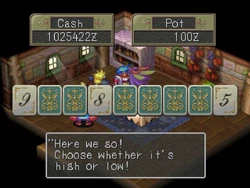
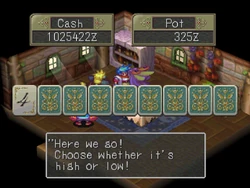
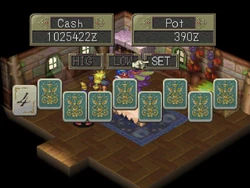
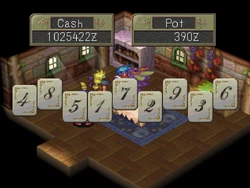
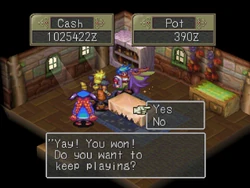
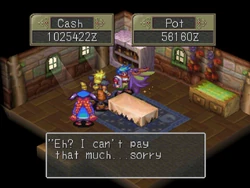
High & Low is a game where you must guess based on one or more upturned cards, whether the next card will be higher or lower than the last. There are 9 cards, one for each number between 1 and 9. You can wager from 1-100 zenny, and get bigger payoffs, the more correct cards you guess in a row. You can guess on just one card, all eight, or any number in-between - it's your choice, but if any card is off, you lose the entire pot. When you win, you can risk it all and continue or quit while you're ahead. Note that if the pot gets too big, you will be prevented from continuing.

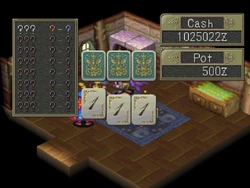
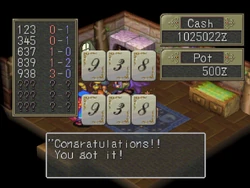
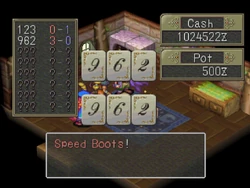
The second game you can play is the Numbers Guessing game, where you put up 500 zenny each game, to try to guess a number in as few guesses as possible. The number has three digits, ranging from 1-9, with no digit used more than once. Each time you guess, you're told how many digits are correct and in the correct sequence (called at "Hit") and how many digits are correct, but out of sequence (called a "Blow"). Hmm... are we smoking the 500Z pot here? By guessing the correct number within 8 attempts, you win a prize, receiving better prizes for fewer guesses.
|
|
Copy[]
The copy shop is one of the most useful functions of the faerie village. If you give up one of your items, the faerie will attempt to copy it, returning two of the same item after a period of time. Since one shop can only work on one item at a time per worker, you may want to open up two or three shops later in the game. Although you may attempt to have any normal item copied, you need to exercise a little caution here. First of all, you must live without the item while it is being copied, and though copying usually doesn't take terribly long, it's long enough to pose an inconvenience, depending on the item. Further, the copy may fail. Failure is fairly common, but you usually have a reasonable chance of it being a success. Success rate and duration until completion are affected by intelligence of the faerie and monetary value of the item being copied. Since copying requires intelligence, only use 100% intelligence faeries if you want to have a high success rate. Finally, though it is not common, sometimes copying can go horribly wrong, turning your item into a Rice Ball (a worthless piece of mush). Though you shouldn't expect this to happen often, if you have a particularly valuable or unique item being copied, make sure you SAVE before entering the village. If you SAVE inside the village, once the copy is complete, success or failure has already been determined, so reloading at this point will not help. Adding additional faeries to the copy shop will allow all faeries in the shop to work on copying different items at the same time.
| Battles | Copied Item |
|---|---|
| 10 | Dagger, Melted Blade, Cheese, Plate, Gems, Clay Vase, Marbles, Moldy Vase, Dirty Rags, Tea Cup, Beads, Rare Book |
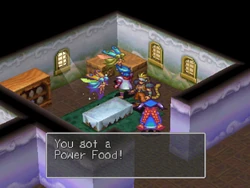
| 12 | Life Shard, Magic Shard, Power Food, Protein, Swallow Eye, Fish-head, Moxa, Old Painting, Myria Icon, Ladon Icon, Lithograph. |
| 14 | Coin, Vitamins, Wisdom Seed, Hourglass, Ivory Dice. |
| 16 | Moon Tears, Wisdom Fruit, Dragon Tear. |
| 18 | Speed Boots, AsbestosArmr, Light Bangle. |
| 20 | Feather Sword, Heavy Dagger, Magma Armor, PhantomDress, BlizzardMail, Flame Shield, Ice Shield, UV Glasses, Ring of Fire, Ring of Ice, Thunder Ring, Ding Frog, Artemis' Cap. |
| 22 | Aries Glove, Silver Tiara, Divine Helm, Cupid'sLyre, Shaman'sRing. |
| 24 | Holy Avenger, Diana'sDress, Mist Armor, Life Armor, Ivory Charm, Spirit Ring. |
Gallery[]
")
")
")
")
")
")
")
")
")
Breath of Fire IV[]
After helping the Faeries get rid of the dream monsters that took over the Faerie Village, one of the faeries catches up to Ryu and co. in their journey to Wyndia and enlists them to help rebuild their village, as they've been gone too long to know how to take care of themselves anymore. This starts the Faerie Village building and maintaining section of the game, which the party can re-enter at any time they want as the same faerie stays with them throughout the trip, accessible during camping scenes.
As this series start with only four Faeries living in the village, Ryu will have to help on making their population grow which is done by assigning faeries to hunting as their jobs/orders. From time to time, when examining the "!" spots on the world map, you will sometimes help the faeries hunt for food. By killing the animals quickly and not letting them move too much, you will get higher quality meat that can feed more faeries per piece. You can also take any food you hunt for yourself as well, as they all have healing abilities.
Every time you enter the Faerie Village, a bulletin board is always present along the path. This is where announcement of birth and jobs are posted.
Jobs / Orders[]
- Free - The default position for new faeries, they will appear throughout the world and share local gossip, opinions on your leadership, or information about themselves. It also improves the faerie's SL rating.
- Art - The faerie will allow you to view a gallery of the game's official artwork. The selection is based on the town's culture rating and the assigned faerie's SL rating.
- Aurum - The faerie allows you to buy and sell Aurum in a stock market like simulation. If a second faerie is assigned this job then they will provide you with advice based on the current market prices.
- Bonds - The faerie will offer the party life insurance. If purchased, the party will automatically be revived if they get a game over, but will lose a percentage of their current Zenny in the process.
- Build - The faerie will assist in building more houses.
- Clear - The faerie will assist in clearing the land, so that additional houses may be built.
- Games - The first faerie assigned this task will allow you to play Kecak, a musical rhtyhm-based minigame. Assigning a second faerie will allow you to rename faeries. Assigning a third will open a rock-paper-scissors style minigame. Each game costs 300 Zenny to play.
- Grow - The faerie will assist in growing food for the village. The quantity and quality of the food increases each time a Fertilizer item is used.
- Hunt - The faerie will help find food for the village. The game's tutorial recommends that you have approximately a third of the village's population assigned as hunters at any given time. Occasionall visiting a "!" location on the world map will allow you to assist the hunter faeries in a Hunting Minigame.
- Inn - The faerie will run an inn where the party can rest for free.
- Items - The faerie will run an item shop. The variety will vary based upon the village's Culture rating. The potential stock varies based on the faerie's personality.
- Music - The faerie will allow you to listen to the game's soundtrack. The song selection is based on the town's culture rating and the assigned faerie's SL rating.
- Search - Sends the faerie out on a search party to find and retrieve items. There are five different difficulty settings. The higher the setting the more valuable the potential reward, but the higher the chance that the faerie will be killed on the mission.
- Troops - Faeries in a troop will randomly aid the party in combat via the use of faerie magic. The more faeries assigned to this job, the more powerful the spell will be.
- Weapons - The faerie will run an equipment shop. The variety will vary based upon the village's Culture rating. The potential stock varies based on the faerie's personality.
Music
Like Breath of Fire III, listening to in-game music is entertainment-based. Opening a Music Shop is also necessary in tandem with Troops in order to utilize the War Shout skill. When you first open a Music shop, only one song will be available to hear, but as you progress, more songs will rapidly be added until all 57 songs are available for your listening enjoyment. The last song you will have access to is "Castle in the Sky," so if this one is available, you know you've gained them all. Unfortunately, not every tune in the game is included amongst these #. There are no skill requirements for musicians. Adding additional faeries will allow them to generate songs more rapidly. If you have a second faerie in your music shop, she will play the
Music Shop Tracklist:
- Starlight Run
- Walkabout
- By The Numbers
- Bring Home A Win
- Slow Tension
- Endings and Beginnings
- Trouble Ahead
- Ephemeral
- The First Emperor
- Fighters
- Take The Money And Run
- Battling Gods
- Desert Town
- Round And Round
- Under Pressure
- Bastard Sword
- Another Working Day
- All Mixed Up
- Poisoned Air
- Truth And Fiction
- Watch Your Step
- Darkness
- Traveling Merchant
- Macho Man
- The Sound Of Money
- Brave Heart
- Requiem
- Shepards
- Free Fall
- Neverending Rain
- Tree Spirits
- Song Of The Plains
- Thousand Winds
- Seeing Is Believing
- A Distant Land
- Hills And Streams
- The Sun And The Moon
- 1-2-3 1-2-3
- Samba
- Today's Catch
- A Whopper Of A Tale
- Faeries
- Game Over
- Prayer
- Unwavering Courage
- The Curse
- Turismo
- Replay
- Seagulls
- Sailing The Seven Seas
- Pabupabu, Pukapuka
- For the Princess
- Divine Danger
When a second faerie is placed in the Music Shop, she will offer to sing for you. Her songs include the vocal themes from the Frog sitar player at Frog's Coast, as well as the ending credits theme (once a clear save file is used), sung by composer Yoshino Aoki.
- Whirlpool
- Islands Everywhere
- Floating
- The Endless
- After The Dream
Breath of Fire: Dragon Quarter[]
After rescuing a Faerie from behind a door on the pathway between LowSector and BioCorp Labs, the player can be transported to their Colony by either using the Faerie Drop or talking to one of them in town. The Faeries have befriended intelligent Antz, who are responsible for labor.
The first order of business is to have the Antz dig around and find spaces that can be used as rooms for the Faeries to live in. The Diggers have a few hurdles to overcome such as stone blocks that cause cave-ins, dangerous Ant Lions, or even water traps. You'll need to hire Antz with good HP to have them survive these hurdles. Once the Ants dig up a room, a Job can be setup, In the beginning the only options are The Lab and Merchants but more jobs will become available as you support the Colony.
Antz have three stats that will determine what their role will be within the colony. HP, Smarts, and Taste. HP Antz should focus on physical labor, Smarts should deal with brainy labor, and Taste should deal with food and the arts.
Antz are paid a fee which come out of the Colony Funds, the player can support the colony by putting their own money into the Colony Funds but most of the Jobs offered generate their own revenue. Better Antz in the required jobs increases the money generated so its a best to make sure the colony is properly managed otherwise the colony will collapse.
Jobs[]
Laboratory[]
One of the two starting Jobs, Smart Antz can think up new jobs and even build some items for the player.
| Item Name | Description |
|---|---|
| Junk | Sellable Item |
| Stuffed Toy | Unique Weapon for Nina |
| Present | Item that raises one enemies drop rate in battle |
| Mirage Bomb | 20 AP Skill for Nina |
| Tracker | Raises the range of which enemies can be seen on the mini-map |
| Slapper | Weapon for Nina that has the Chop! Skill |
| Gold XP | Raises XP in battle by 5% (Stackable) |
| Mirage Blast | 30 AP Skill for Nina |
Market[]
The second starting Job, Markets sell various items based upon what kind of shop the player decides to open. Their are four types of shops and the longer they stay open the more items will become available to purchase. The player can choose to make a shop that sells Skills for the characters, many of which are only available through the shop, and the player can make a shop that sells wares for one of the three party members. These shops are special note because they offer some one of a kind items and low level versions of some of the characters best weapons and armor.
| Name | Price |
|---|---|
| Impact Gear +3 | 4680z |
| Bari Shell | 5000z |
| Ruby Maser +2 | 3600z |
| Plasma Maser +3 | 3900z |
| Bari Guard | 15000z |
| Saphire Maser +4 | 4200z |
| Protect Suit +1 | 66000z |
| Strong Sword +8 | 2700z |
| Chobham Plate | 36000z |
| Legend Blade +1 | 88000z |
| Name | Price |
|---|---|
| Antenna +5 | `1800z |
| Impact Check +3 | 3900z |
| Bari Ring | 5000z |
| Holy Heart | 20000z |
| Delux Antenna | 6800z |
| Bari Loop | 15000z |
| Divine Coat +1 | 52800z |
| DemonScythe | 20000z |
| Platinum Arc | 9000z |
| Wizard Wand +1 | 88000z |
| Name | Price |
|---|---|
| Flameblaster +2 | 3840z |
| Bari Ribbon +1 | 5500z |
| Impactproof +1 | 3690z |
| Thunder Rifle +3 | 4160z |
| Ice Cannon +4 | 4480z |
| Bari Bangle | 15000z |
| Quick Garter +6 | 6240z |
| Save the Queen +1 | 59400z |
| Lightwave | 9000z |
| Grenade +1 | 129800z |
| Name | Price | Party Member |
|---|---|---|
| Hex | 240z | Ryu |
| Fireblast | 240z | Nina |
| Iceblast | 240z | Nina |
| Lightning | 240z | Nina |
| Weapon Boost | 240z | Shields |
| Shield Boost | 240z | Shields |
| Cutspace | 240z | Ryu |
| Divine | 240z | Nina |
| Slow | 240z | Nina |
| Skullsplit | 240z | Ryu |
Explorers[]
This job sends physically stout Antz out through the various Sector's to scavenge for Treasure
Cafeteria[]
Antz with a flair for cooking set up a cafeteria to make money for the colony. Good for keeping the finances of the Colony steady in the early parts of the game.
Concert Hall[]
Plays music from the game, and also makes a steady pay for the Colony.
Song List:
- Sky Gazing
- Good Friends
- Ranger HQ
- LowSector Borough
- The Lift
- Victory Feast
- BioCorp
- The Attack
- Distant Call
- Origin
- First Determination
- They Who Rule
- Abandoned Shaft
- Adversary
- A Small Beginning
- EndSector Borough
- Industrial Sector
- Danger Approaching!
- Prologue
- Tearful Memories
- Prelude
- No Regrets
- Old TradeSector
- MidSector Borough
- The Trinity Pit
- Lifeline
- Title Logo Jingle
- Opening Movie
- PowerOne
- Last Vestiges
- Serenity
- Centre
- The More We Dig..
- Mad Heart
- Omens
- The Color of Grief
- The True Way
- Breaking Through
- A Moment's Joy
- The Reunion
- Forget Tomorrow
- Trapped
- Just Smile!
- TopSector Borough
- A Silver Color
- Kokon-Horay
- Ending Movie
- Cradle In The Sky
Bank[]
Players can leave their money for protection from SOL Restore/Restart or party wipe outs. Money is paid a standard interest rate which get paid in after the player kills a certain amount of enemies. Besides the basics account the player can also place money in special interest accounts like the 100 or 500 account which grant a huge interest bonuses after the player kills a hundred or five hundred enemies depending on the account. The Foreign Exchange Option is pretty much like the Stock Exchange from BoFIV, where the player buys "mils" at a price and then tries to sell them when the prices rise, sell high and buy low to make a fortune.
Trainer[]
Players can have their new Antz recruits go here and train in specific stats for future work in one of the other jobs. Great for getting new recruits up to par and needed for some of the more complicated or dangerous Jobs.
The Daily[]
This job involves writing a paper for the Colony, this Job is unique in that it requires an three Antz that specialize in one of the three stats. HP Antz are reporters, Smart Antz are editors, and Taste Antz for writing. Makes good money and can be challenging to maintain.
The Review Board[]
A panel of Antz keep track of the various player stats like number of enemies killed and rooms traveled to which can be useful for Perfect Game playthroughs. This Job also has special challenges the player can partake and win some good prizes if they succeed in them.
| Playable characters | ||
| Ryu · Nina · Lin · Bosch | ||
| Dragons | ||
| Odjin · Chetyre · Dover | ||
| Notable characters | ||
| Violet Zeno · Mebeth · Elyon · Hortensia · Jezuit · Deamoned · Ventriloquist | ||
| Bosses | ||
| Chetyre · Vexacion · Bosch · Zeno · Asimov · Tantra · Cyclops · Dover | ||
| Locations | ||
| EndSector Borough · LowSector Borough · Deep Earth · Genic Accumulator · Lift to BioCorp · Old Waste Shaft · Ranger HQ · Sheldar · CorpLab · Frozen Road · Genic Processor · IndustOne · IndustTwo · Storage · MidSector Mall · MidSector Borough · Old TradeSector · Trinity Pit · Lifeline EndSector · Lifeline LowSector · Lifeline Mid · Lifeline Top · Main Shaft · TopSector Junction · TopSector Borough · PowerOne · Centre · Cemetery · Geovator Terminal · Geofront LowSector | ||
| Tribes | ||
| Faeries · Genics · Grassrunners · Humans · Woren | ||
| Archive | ||
| Items · Weapons · Armor · Abilities | ||